Thursday 29 April 2010

Ten things

  • I've entered two of my tops into the 2010 Spring Top Week competition, by Made by Rae. As I've been making so many tops these past few weeks it seemed rude not to. This sudden spring weather has got so many people sewing tops.  You can see all the other fantastic entries in this Flickr pool.
  • I made a great loaf of bread for supper the other night.  It is a batter bread, rather than a dough bread, so does not need to rise.  Recipe here.  My children won't eat olives or asparagus, so I made it just with sundried tomatoes, herbs and cheese and it was a roaring success.
  • O has gone up a grade at ballet and now wears a red leotard which really suits her. She suddenly looks so elegant and grown up.
  • She learnt how to ride her bike at the weekend, and I shrieked like a mad woman when she cycled away from me for the first time.  So exciting!
  • The garden is full of cherry blossom, drifting down from our tree.  It looks nearly as pretty on the patio as it does on the tree.
  • I made a peanut butter cake this week.  It's another BBC Good Food recipe, which you can see here.  I left the peanuts off the top, and used crunchy rather than smooth peanut butter, but otherwise stuck faithfully to the recipe.  Really, really good.
  • I am reading Mathilda Savitch by Victor Lodato, which is brilliant and energising. Next up is Wolf Hall, which I've been waiting to come out in paperback for what seeems like ages.  I'm glad I waited though, because the paperback is pretty chunky and the hardback would have been far too heavy to lug around in my handbag.
  • The next top I'm going to make for me is the trapeze sundress from Weekend Sewing.  And I'm also going to make O a top version of the Oliver + S ice cream sundress, which I think I will like better on her than the dress version.
  • I've been cutting up scrap fabrics and making bunting for the past few days.  Cutting up huge piles of fabrics with pinking shears is hard on the hands.
  • I took some photos of the bunting, but struggled to get it all in one shot. So I took a film of it, which then turned into a film of the chickens.  Have a look - you'll find out what a broody hen sounds like!

Sunday 25 April 2010

Childhood bread

I bought an earlier model of this bread machine five and a half years ago, and I have not bought one shop-baked loaf of bread ever since.  As long as you have the ingredients around, it takes no more organisation to put a loaf of bread on to bake than it does to nag your children to brush their teeth or check the hens have enough food and water for the day.  I can get a loaf of bread going in the bread machine far quicker than I can make a packed lunch.  And my bread machine has a timer, so I can set it to bake while I am out, or when I go to bed, and it will finish at the time I specify.  Very straightforward.

But I recently acquired from my mother her bread recipe, which I remember very clearly from when I was a child.  I daresay I could have made the recipe in my bread machine, but that's not how she did it, so somehow that felt all wrong.  Plus after five years I was starting to think that it would be nice to have a loaf of bread without a hole in its bottom from where the mixing paddle has been pulled out.  And part of me also felt a bit of a fraud; making all this bread, but not actually doing anything more taxing than weighing ingredients.  Can that really be called bread making?

So I copied down her recipe, came home and set to work making my first handmade loaf.  The recipe, because it dated from my childhood, was in imperial measurements.  I can't think in imperial measurements at all.  The metric system must be hard wired in me.  Even with all the sewing I do I find it very hard to visualise an inch, but no problem at all to visualise a centimetre.  I know how much meat I will get when I ask the butcher for 500g of beef mince, but I have no idea what 1lb of sugar looks like.

I started putting together ingredients, and letting the yeast ferment, not really paying too much attention to the quantities I was weighing out.  And you know what, it turns out that 3lb is an absolutely ENORMOUS amount of flour.  Who knew?   Not me.

I found myself with so much bread dough it was spilling over the top of my mixer bowl.  I put the dough into tins, dotted them around the house, and the dough kept on rising and growing.  I dug out more tins (circular cake tins, because I had used all my loaf tins) and divided the dough, but still it kept growing.  It was like The Sorcerer's Apprentice, but with bread rather than water.

I ended up with so many loaves of bread that I filled almost a whole drawer in the freezer with them.

The bread was absolutely delicious though, and when we'd cleared the freezer we still wanted to eat more.  Just in saner, smaller quantities please.  So I put the original recipe into Excel, converted it into metric and scaled it down considerably.  And here, for all of you to enjoy, is the amended version of my mother's delicious homemade bread.


The List Writer's Childhood Bread

For one loaf of bread you will need:
  • either a 1lb or 2lb loaf tin (I know, I know - those darned imperial measurements again, but it seems that bread tins are still made and sold in imperial sizes. Note to Lakeland and other cookware retailers - please go metric with your bread tins; this is 2010). Either size tin works.  If using the bigger tin, you will end up with a wider, shallower loaf, which I rather like.
  • 300g wholemeal bread flour (I use this one from Abel & Cole)
  • 150g white granary flour (I use this one by Allinson's)
  • 280ml hand hot water (this is pretty hot - as hot as you can bear while still able to put a finger in without flinching)
  • 1 heaped teaspoon dried yeast (I use this one from Doves Farm)
  • 1 heaped teaspoon of molasses or black treacle (I use Tate & Lyle's red tin)
  • 1 tablespoon of vegetable oil (I am a recent convert to organic rapeseed oil - I LOVE this one which I can get at Waitrose)
  • 1 level teaspoon of salt


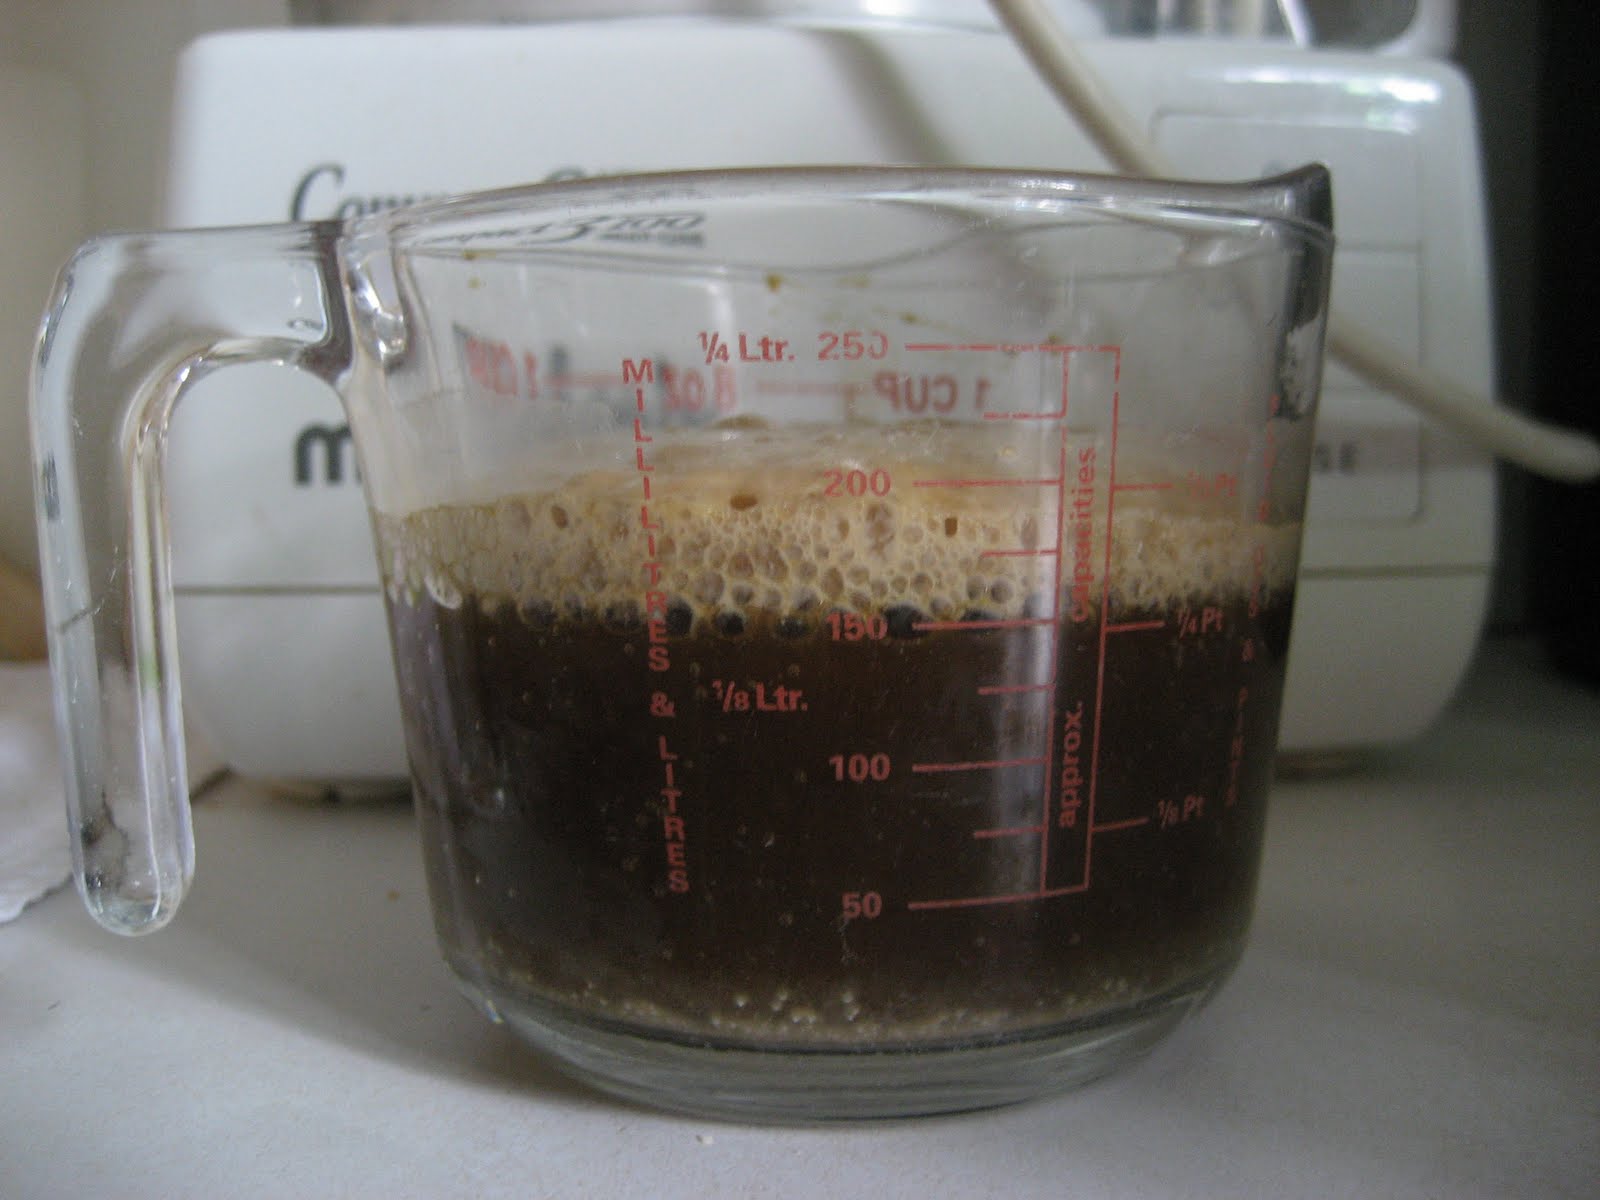
Put half the hot water (140ml) into a small jug.  Add the treacle and stir to dissolve.  Add the yeast and stir again.  Leave to rise until it is roughly at the 200ml mark (about 10 to 20 minutes, depending on how hot your water was).  Meanwhile put all the other ingredients into a large mixing bowl.

Your water, treacle and yeast mixture will go from this:


to this:


When the yeast mixture has risen, add it to the dry ingredients in the mixing bowl, and also add the remaining half (140ml) of the hand hot water.  Mix everything together and knead the dough until it is no longer sticky, but feels slightly elastic.  You can do this by hand, in a food processor with a dough paddle, or in a mixer with a dough hook.


Then put the ball of dough into a clean, lightly oiled bowl.  You can also lightly oil your loaf tin at the same time.


Put a cloth over the bowl and leave your dough somewhere nice and warm to rise. I stick mine on the floor, in the hall, underneath a radiator.  If it suits you to have a slow rise, you don't need to put the dough in a warm place.  If you want it to rise overnight, you can even put it in the fridge (covered).  The warmer the place, the faster it will rise.


When the dough has grown to roughly double the size it first was, give it a punch to deflate it, and then press it into your oiled bread tin.  Cover the tin and leave it to rise again until the dough is nearing the top of the tin.


Then all that's left to do is put it in the oven at Gas 6 (or 205 Celsius) for 30 minutes.  When you take it out of the oven, tip it out of the tin right away.  Tap the bottom of the loaf and it should sound hollow.  If it does not, put it back in the tin and back in the oven for another five minutes.


Leave to cool and then enjoy.  I love it as simple bread and butter, but it reaches new heights of gorgeousness when toasted and spread with honey. Yum.

~~~~~~~~~~

For those of you who are visiting from Florence's blog and were expecting to read about dressmaking, don't worry - this is just a brief interlude before I go back to sewing tops, school dresses, dolls clothes and bunting (my sewing list for the next week or so).  I need some bread to sustain me while I sew, though!

Thursday 22 April 2010

My Liberty top

The aeroplane noise and the vapour trails are back. I didn't have to travel anywhere and was not waiting for anyone to come home, so the deep blue un-scribbled-on skies, and the still silence were unequivocally lovely. Now the planes are back they are all I can hear. We're under the flypath for City airport and sometimes get aeroplanes stacking above us for Heathrow as well. Add in the local police helicopter, the London air ambulance and the occasional military chinook going over, and it all seems very busy.

But I'm sure before long though I'll be used to it again, and with so much cherry blossom in the garden I am in very good spirits and I can't really see the vapour trails through the blossom.


I'm still sewing tops.  There is one final school dress to make for Livvy, but I've had enough of blue gingham for a while, so I'll do that over the weekend.  Instead I made myself another Quadrato Tunic top from Ottobre yesterday - here is the first one I made, last month.

This time I made it with a much lighter, lawn fabric - one of the Liberty prints I bought at the V&A exhibition.  The contrasting pink trim was made with a thicker, stiffer cotton duck - one of Cath Kidston's haberdashery fabrics.


These fabric choices were much better than the ones for my first attempt.  And the fact that I cut a smaller size, and remembered to add on the seam allowances, meant that this version is much closer to the original, and looks much better on than my first attempt.


So I have now made myself four new tops over the past few weeks - two summer blouses from Weekend Sewing and two of these Ottobre tunics. I'd happily wear these two styles all summer long but I feel I need to hunt out some more patterns if I make any more clothes for myself.  It might look weird having a wardrobe full of tops in just two styles.
 
I've recently acquired a whole pile of vintage fabrics from my Grandmother, including some deliciously thick, crisp white cotton sheets.  I have a vision of another - third - Heather Ross summer blouse made from soft, white cotton, with a deep coloured trim. Either with the Michael Miller TA Dot fabric in fuschia that I used to bind my last quilt, or with a dark blue and deep pink Kaffe Fassett print that I have been hoarding for too long.


It's tempting, isn't it?

Tuesday 20 April 2010

The second school dress

Today I finished O's second school dress.  For this one I used the Oliver + S Ice Cream Dress pattern, which is from their new spring range and comes in sizes from 6 months to age 12.


This is the first time I've made an Oliver + S pattern, and I didn't like it as much as the Simplicity or Ottobre patterns I've used.

Oliver + S get much praise for creating patterns which give you 'professional looking' garments.  To me though, that professional finish comes at the cost of the whole pattern being far too fiddly and long winded.  One of the most onerous and bizarre suggestions was to sew a line of tacking (or basting) stitches whenever you folded a seam, to give you a neat guide line to fold your seam on.  I don't find folding a 1cm seam too difficult so I skipped this step whenever it was suggested.

The yoke was constructed in a very unintuitive way, and I had several sweary moments when I sewed pieces on the wrong way round or caught excess fabric up in a seam by mistake.


The bottom (dark blue) panel is made with a double thickness of fabric, and the way it is constructed means that the dress is not hemmed because there is no unfinished edge at the bottom.  The pattern designers may have thought that not hemming a dress makes life easier (and hemming is tedious, I agree) but it meant that I had no adjustability with the length, and the dress has come out about 3cm shorter than I wanted.

It is a sweet dress to look at, and is indeed finished very neatly and professionally, but I found the whole process far more fiddly than was necessary. 

My biggest issue, however, is that the finished dress is very wide and sack-like on O - you could fit two seven year olds inside!  I think the design would work much better on a stout toddler than on a slim, leggy older child.


The pattern also contains a blouse version of this dress, and I will probably make that for O, but I don't think I'll be making another of these dresses.  And I definitely would not make this pattern in gingham again - all those lines and squares to match up along the panels and the pockets did my head in - forgiving non-directional prints are the way to go with this one!

Sunday 18 April 2010

School holidays, school dresses

These school holidays have passed in a very satisfactory, full sort of way.  We had a long, lazy Easter weekend, spent some days in Oxford with my parents (and went to the fantastic Black Country Living Museum - do go if you live in the Midlands), saw the Cuban National Ballet on tour in London, had days out with friends geocaching in Epping Forest and learning about cell biology at the University of London Medical School, went running around Kew Gardens with cousins, and even managed to fit in a couple of lazy days at home.

The holiday was rounded off beautifully yesterday, with my nephew Ben's Christening.  He is now my Godson as well as my nephew, and I took full advantage of my special dual status to get as many cuddles as I could with him.

Three generations - my father, me and nephew/Godson Ben

And today I've started to turn my attentions to the new term at school.  I made O the first of several school summer dresses.  The pattern I used is the dress version of the strawberry top I made her last month - Simplicity 2986.


I added a patch pocket, and used some ricrac and ribbon to fancify it a little bit.  The ribbon down the centre of the yoke looks a bit strange - not how I pictured it.  Next time, I'll add buttons instead.


For the facing on the yoke I used some of the Liberty limited edition V&A fabric.  It is very soft cotton so perfect for a lining or a facing, and I rather like the idea of having a very non-uniform fabric hidden away somewhere on the dress.


I bought the gingham fabric from Fabric World - and got metres and metres for £10.  I initially tried Doughtys, but when I opened the parcel of gingham it was a bright turquoise, and the wrong size of check.  I'm all for hiding a bit of secret Liberty fabric on a school dress, but large turquoise check would be pushing the school rules too far I think.

But it was not a disaster getting a parcel of bright turquoise gingham.  I made myself a second summer blouse from Weekend Sewing.  This time it was trimmed with a luscious green Kaffe fabric, last spotted as the backing of my cushion here.


And I love how it turned out again.  Light, floaty, swingy - and in this turquoise gingham rather bright and zingy!


So they have been a really good couple of weeks, and we're all ready for the excitement of the summer term and maybe some cheeky camping weekends if this warm, sunny weather holds. 

I'll leave you with another gratuitous baby photo - this time of Ben with his oldest cousin Cam.  What a gorgeous pair of boys!

Tuesday 6 April 2010

A summer blouse


I have wanted to make this summer blouse from Heather Ross's Weekend Sewing from the moment I got the book.  I love this book and have made so many things from it over the last year, but this blouse had mixed reviews from the many people who made it and I hesitated.

However, I kept coming back to the picture in the book and the many fine examples on the Flickr group.  I really wanted one of my own.


The criticisms centred around:
  • the placket - too low
  • the sleeves - too long
  • the length of the top - too short
  • the ncekline - too high
But what I really appreciate about Heather's book is that she assumes you will adjust the patterns, and she makes it easy for you to do so.  Indeed when you are sewing clothes, rather than buying them, the great benefit is that you can adjust them to fit and look exactly how you want.

I traced the pattern, and then looked at the pieces and made some adjustments.
  • I made the front and back 8cm longer
  • I adjusted the front neckline a tiny bit - by tracing the pattern line slightly lower(about 1cm I guess)
  • I lopped 12cm off the placket
I left the sleeves as they were because I have long arms, and like my sleeves to come well over my wrists, as they do in the photo of the blouse in the book, but in the end I cut off 4cm when the blouse was finished - they did come out very long.

The main fabric I used is an old Amy Butler one - as ever my choice for a first attempt was determined primarily by what fabric I had enough of.  It is a green and purple flower print in quilting-weight cotton, and works well.  A lawn or voile would be even nicer, so I am now saving up even more determinedly for some of that Anna Maria Horner fabric I have been dreaming of for what seems like so long (but in fact must only be a few weeks).


The contrast fabric is by Phillip Jacobs for Rowan.  It is the geranium leaf pattern in the bravely named 'sludge' colourway.  I just love this fabric - despite its off-putting name.  I bought it to make a jewellery roll for my mother-in-law at Christmas, because she requested something in purple, and when it arrived I immediately wanted to make so many things with it.


Weekend Sewing is aptly named because you could very easily make this blouse in a weekend.  I made it in a day, including the slow pattern tracing, and rummaging on the internet for tips on adjustments.  I love how it looks - the swingy shape, the long sleeves, the simple, open neckline.  I will wear it and wear it (and make a whole lot more of them).


The final adjustment I made was to hem the wrists and the bottom with the contrasting binding rather than just a plain hem.  I do love that geranium fabric.


The only thing I would do differently next time is to miss off the button loop - which was fiddly anyway.  The shirt doesn't need closing, and the neckline hangs open so beautifully to reveal the contrasting fabric.  It is simply a lovely, wearable design.


Saturday 3 April 2010

The Victoria and Albert cushion

Those strips of unbleached calico with appliqueed circles from my last post, have become a cushion, for me.  I thought they might.  The circles had been inspired by so many things I saw at the V&A quilt exhibition - circles, scrap fabrics, fussy cutting, hand-sewing, small patterns - that the only way to finish them off was to use some of the limited edition Liberty fabric I bought at the exhibition to make a simple border.


This Liberty fabric is so beautiful to sew with.  It isn't their tana lawn, because it was about half the price, but it feels like lawn or voile - very fine, soft and drapey.  I'm very pleased I bought more in some other patterns, to make clothes with.


I finished the top off with more inspiration from the exhibition.  A little bit of embroidered labelling; my initials and the date.  The back is made from more circles, but this time in a glorious, green, Kaffe Fassett fabric I'd forgotten I had (shame on me).


And then when I moved everything off the sofa to take these photographs I realised that I've now made cushions for G, O and me (as well as my nephews and nieces, my mum and a dear friend - I really enjoy making cushions).  So obviously C needs one now.